Overview
Even in 2017, it is quite common to find the hand built, artisinal, bespoke development environment. As a leader in your technology group you will recognize this as the first two weeks of a new-hire’s tenure where they are not contributing any sort of value, but constantly interrupting their team mates to get to a point where they can.
Vagrant makes such a situation a thing of the past, but that is only the beginning.
Developers develop. They change things and they need the freedom to take risks with software component upgrades.
This tutorial is designed to introduce concepts and leave you with a working Python development environment. It assumes no knowledge of Vagrant or its virtualization concepts. Because much of the effort will be downloading large files, plan for it to take between 2 and 3 hours.
Terms and Concepts
By far the most important concepts to understand during this tutorial are those of workstation and guest:
- Workstation – Your laptop. It will act as the host for one or more guest machines.
- Guest – A virtual machine started with Vagrant Up.
These concepts are important to understand so that you have a firm idea of where the execution of a command takes place.
A couple of other important concepts are hypervisor and mount point.
- Hypervisor – the software that allows a guest to run on your machine and handles much of the “plumbing” like networking and file systems.
- Mount Point – A directory in the guest machine where files from the host are present on the guest as well.
And for the purposes of this article the projet root and project directory:
- project root: A directory called ~/victorycto and will be the place where you can put numerous other tutorial project directory’s from Victory CTO.
- project directory: A directory that is a child of ~/victorycto representing a tutorial.
These would usually be the source directory of your own PHP, Python, Ruby, etc al project.
Prepping a Vagrant Workstation
To make sure your workstation is ready, you must install Vagrant and Virtualbox. You will also need to create a place to work.
Install Virtualbox
To install the latest version of Virtualbox, downloads are found here. You will need to run the install process.
Virtuabox is a free hypervisor that will allow you to run various guests on your workstation. You can think of it as the software that racks and cables your guest into your workstation.
Trust but Verify:
%> vboxmanage --version
5.1.26r117224
Install Vagrant
To install the latest version of Vagrant, downloads are found here. It will take 15 minutes or more.
Gotcha!: Vagrant and Virtualbox should be kept as up-to-date as possible. Upgrading one can lead to problems with older versions of the other. This tutorial was written for:
- Vagrant: 1.9.8
- Virtualbox: 5.1.26
Trust but Verify:
%> vagrant --version
Vagrant 1.9.8
Create a Workspace
On your workstation open a terminal and create a workspace in your home directory and move into it:
%> mkdir -p ~/victorycto/vagrant-101
%> cd ~/victorycto/vagrant-101
What Happened?: Paths will matter, so we want to use something less generic than “code”. The name victorycto is unlikely already in your home directory. The name of our project is vagrant-101. Eventually this is where our little web app will live.
Explore Vagrant Guest Concepts
In the directory ~/victory/vagrant-101, create the Vagrantfile
%> vim Vagrantfile
Gotcha!: Note the file name is capitalized!
Copy the below into the Vagrantfile and save it.
Vagrant.configure("2") do |config|

# The type of guest you are running.
#
# In this case it is Ubuntu 16.04 LTS, 64 bit.
config.vm.box = "ubuntu/xenial64"

end
Now start the guest server on your workstation. This could take up to 30 minutes, so please read ahead:
%> vagrant up
Bringing machine 'default' up with 'virtualbox' provider...
==> default: Box 'ubuntu/xenial64' could not be found. Attempting to find and install...
default: Box Provider: virtualbox

...  ...

default: Downloading: https://vagrantcloud.com/ubuntu/boxes/xenial64/versions/20170830.1.1/providers/virtualbox.box
==> default: Successfully added box 'ubuntu/xenial64' (v20170830.1.1) for 'virtualbox'!
==> default: Importing base box 'ubuntu/xenial64'...

...  ...

==> default: Preparing network interfaces based on configuration...
default: Adapter 1: nat
==> default: Forwarding ports...
default: 22 (guest) => 2222 (host) (adapter 1)
==> default: Running 'pre-boot' VM customizations...
==> default: Booting VM...
==> default: Waiting for machine to boot. This may take a few minutes...
default: SSH address: 127.0.0.1:2222
default: SSH username: ubuntu

...  ...

default: Inserting generated public key within guest...
default: Removing insecure key from the guest if it's present...
default: Key inserted! Disconnecting and reconnecting using new SSH key...
==> default: Machine booted and ready!
==> default: Checking for guest additions in VM...
default: The guest additions on this VM do not match the installed version of
default: VirtualBox! In most cases this is fine, but in rare cases it can
default: prevent things such as shared folders from working properly. If you see
default: shared folder errors, please make sure the guest additions within the
default: virtual machine match the version of VirtualBox you have installed on
default: your host and reload your VM.
default:
default: Guest Additions Version: 5.0.40
default: VirtualBox Version: 5.1
==> default: Mounting shared folders...
default: /vagrant => /Users/boyd.hemphill/code/vagrant-python
What Happened?: There are quite a few things going on here:
- From the configuration you created in the Vagrantfile, a Unbuntu 16.04 image was downloaded by Vagrant and started within the Virtualbox hypervisor.
- The ssh port for the guest was forwarded from 22 to 2222 (more on this later)
- The machine comes online
- The guest mounts the directory /vagrant which maps to the workspace we created ~/victorycto/vagrant-101
Let’s make this more concrete by working with the guest a bit.
%> vagrant ssh
ubuntu@ubuntu-xenial:~$ whoami
ubuntu
Pro Tip: The directory you are in on the workstation, ~/victorycto/vagrant-101 is the full context for this guest. You can have a different project in a different directory with a different Vagrantfile. When you issue the vagrant up command there, you will get a second guest on your workstation.
What Happened?: By using the vagrant ssh command you have used the ssh port forwarding to become the ubuntu user on the guest.
Pro Tip: Study that output as it is happening and work at understanding what it is telling you. If something is wrong with the guest, it is highly likely the answer to how to fix it is right there in the output!
Exploring Vagrant’s Mount Point Concept
One of the biggest pay-off with Vagrant is the separation of the run time environment from source development. This will be illustrated in great detail later. Fror now lets explore the concepts that underly this capability.
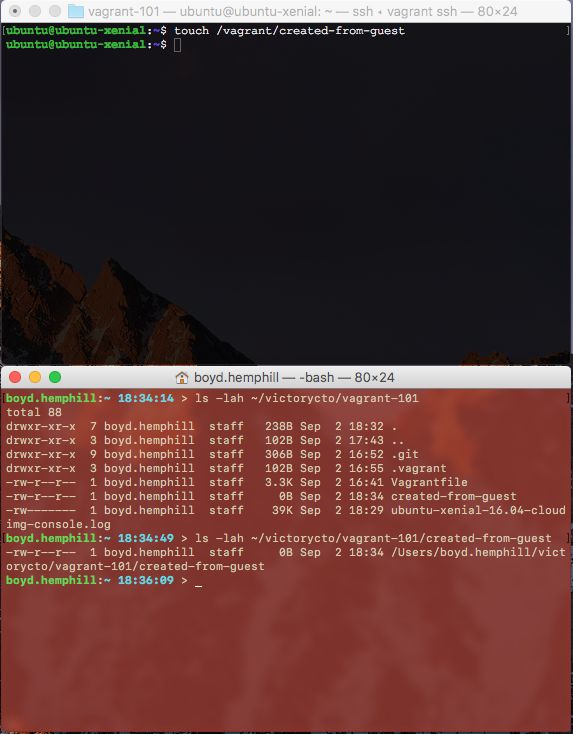
Create a file in the ubuntu user’s home directory.
ubuntu@ubuntu-xenial:~$ touch file-in-ubuntu-home-directory
ubuntu@ubuntu-xenial:~$ ls -lah
What Happened?: Nothing you haven’t done before most likely. You just created an empty file in the home directory on the guest. Note however that this file is completely invisible to your workstation.
Still on the guest, create a file in the /vagrant directory
ubuntu@ubuntu-xenial:~$ touch /vagrant/created-from-guest
Open a different terminal and see the file on your workstation.
%> ls -lah ~/victorycto/vagrant-101
Pro Tip: Use terminals of different colors to distinguish between your workstation and the guest. Below, black is the guest and red is the workstation.
On your workstation create a file in the project directory.
%> touch created-from-workstation
From your guest terminal see the file.
ubuntu@ubuntu-xenial:~$ ls -l /vagrant/
Gotcha!: If you are not seeing the files, ask yourself the following questions:
- Am I on the appropriate machine (workstation vs. guest)
- Did I create the file in the correct directory (~/victorycto/vagrant vs. /vagrant)
Vagrant Provision
Provisioning a machine, in Vagrant terms, is the act of installing packages, users, and other configurations so that it is able to run an application.
Secret DevOps Sauce
It is the act of provisioning your Vagrant guest that allows you to separate your development environment (essentially a git project with your code in it) from your run time.
(servers as code) Further, the configuration of your machine is now described in code that is kept in source control with the project. This means that a developer who needs to add a package can do that without making the change to their workstation.
(disposability) Further still, if the developer makes that change and it turns out to be a bad one, then can simply destroy the guest with vagrant destroy, remove the package from the provisioning code, and launch a new guest with NO need to rebuild the workstation.
(sharing) Further even still, if the change is good, then they push the project and ask teammates to pull and relaunch their own guests. Your team is working from the SAME RUNTIME.
The consequences of this on your teams productivity and creativity are substantial:
(servers as code) No more will it “work on my laptop” but not in the test environment. The code to build the development environment is the code for the test and production environments.
(disposability & sharing) Developer are free to try and upgrade of important libraries knowning they can easily back out any number of changes. What could have been days of risk is now minutes.
(security) Because the configuraiton is code, you can easily upgrade databases, languages, frameworks and even operating systems. A developer and operator (see the DevOps?) can collaborate in a couple of hours to show that all tests pass when moving from Ubuntu 14.04 to 16.04 as an example.
Provisioning the Vagrant Guest
Replace your Vagrantfile with the the following:
Vagrant.configure("2") do |config|

# The type of guest you are running.
#
# In this case it is Ubuntu 16.04 LTS, 64 bit.
config.vm.box = "ubuntu/xenial64"

# Enable provisioning with a shell script. Additional provisioners such as
# Puppet, Chef, Ansible, Salt, and Docker are also available. Please see the
# documentation for more information about their specific syntax and use.
config.vm.provision "shell", inline: <<-SHELL sudo apt-get update sudo apt-get upgrade --assume-yes
SHELL
end
On your workstation, issue the command
%> vagrant provision
Remember that my workstation is the red terminal.
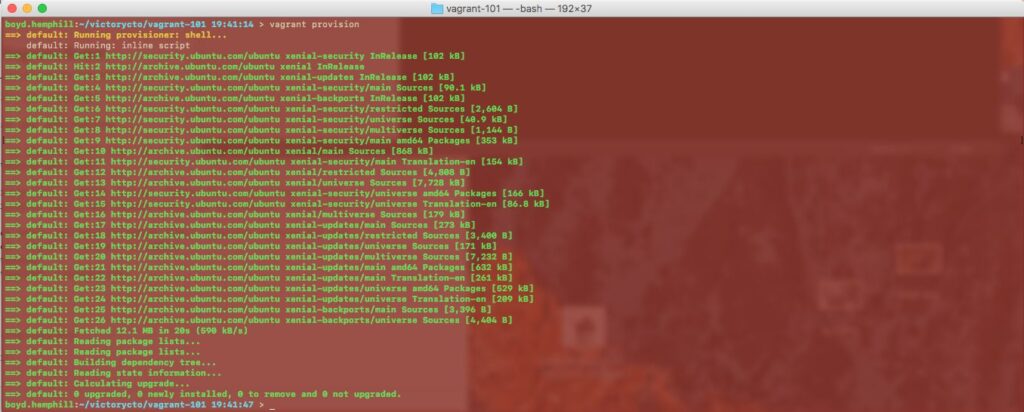
What Happened?: When Vagrant ran this time, it exectued the statements in the shell provisioner to update the package lists and then upgrade older packages.
Don’t let the simplicity of this example fool you. If you can script it, you can put it in the SHELL provisioner.
GOTCHA!: The shell provisioner is not idempotent. You can really only run it once then you will have to destroy the machine to try again. This gets very old very fast. Look for another article on how to use Ansible or Chef to provision your guest.
Developing in a Vagrant Runtime
The rest of this tutorial is based on simple Python Flask application. Don’t worry if you are not a Python developer. This is truly simple stuff for anyone with a technical background.
On your workstation (as if you were a developer working with your dependencies) create the requirements.txt file to install dependencies:
%> vim ~/victorycto/vagrant-101/requirements.txt
Place the following in the file:
Flask
flask-login
flask-openid
flask-mail
flask-sqlalchemy
sqlalchemy-migrate
flask-whooshalchemy
flask-wtf
flask-babel
guess_language
flipflop
coverage
On your workstation, replace your Vagrantfile with the following
Vagrant.configure("2") do |config|# The type of guest you are running.
#
# In this case it is Ubuntu 16.04 LTS, 64 bit.
config.vm.box = “ubuntu/xenial64”
# Enable provisioning with a shell script. Additional provisioners such as
# Puppet, Chef, Ansible, Salt, and Docker are also available. Please see the
# documentation for more information about their specific syntax and use.
config.vm.provision “shell”, inline: <<-SHELL sudo apt-get update sudo apt-get upgrade –assume-yes sudo apt-get install python-pip –assume-yes pip install -r /vagrant/requirements.txt
SHELL
end
On the workstation, provision the Vagrant guest: %> vagrant provision
Take a moment to read through what happened. You should see pip (Python’s package manager) get installed by aptititude then it will install each of the dependencies.
Now consider what happened for a moment. You created a file on your workstation (requirements.txt) then used that file within the context of the guest by referencing it in the SHELL portion of the Vagrantfile.
Developing
On your workstation, create a simple Flask application.:
%> vim hello-world.py
Place this code and save:
from flask import Flask
app = Flask(__name__)
@app.route(“/”)
def main():
return “Welcome!\n\n”
if __name__ == “__main__”:
app.run(debug=True)
Gotcha!: Are you in the directory ~/victorycto/vagrant-101 I will leave it to you to remember that from here on out.
Trust but Verify: On your guest, see that the hello-world.py file:
ubuntu@ubuntu-xenial:~$ ls -l /vagrant
Now it gets interesting.
On the Vagrant guest, start the application
ubuntu@ubuntu-xenial:/vagrant$ cd /vagrant
ubuntu@ubuntu-xenial:/vagrant$ python hello-world.py &
[1] 8693
ubuntu@ubuntu-xenial:/vagrant$ * Running on http://127.0.0.1:5000/ (Press CTRL+C to quit)
* Restarting with stat
* Debugger is active!
* Debugger PIN: 190-841-149
What Happened?: The application started and was placed in the background. You can check this with the command ps -ef | grep [h]ello
Excercise the application on the guest:
ubuntu@ubuntu-xenial:/vagrant$ curl http://127.0.0.1:5000
127.0.0.1 - - [03/Sep/2017 02:18:11] "GET / HTTP/1.1" 200 -
Welcome!
ubuntu@ubuntu-xenial:/vagrant$
The next ticket in my developer queue says, “A user should be greeted to our site with the message: “Hello from VictoryCTO!”
Open the hello-world.py file on your workstation and change line 6:
from flask import Flask
app = Flask(__name__)
@app.route(“/”)
def main():
return “Hellow from VictoryCTO!\n\n”
if __name__ == “__main__”:
app.run(debug=True)
Don’t forget to save it.
On the guest you will see the application restart. Now exercise it again.
ubuntu@ubuntu-xenial:/vagrant$ curl http://127.0.0.1:5000
127.0.0.1 - - [03/Sep/2017 02:32:48] "GET / HTTP/1.1" 200 -
Hello from VictoryCTO!
What you have seen is the separation of the development environment from the application run time. You can develop on your workstation with all the usual tools you would use, but when you exercise the application to test, it is happening on a guest machine configured like every one elses on the team (and hopefully those in test and production!).
But curl is Lame
Obviously we want to view our application in a browser on our workstation rather than from curl on the guest. In fact, we would like to interact directly with the guest as little as possible.
Lets prove this environment is truly disposable.
%> vagrant destroy
Now add to the Vagrantfile one more time:
Vagrant.configure("2") do |config|# The type of guest you are running.
#
# In this case it is Ubuntu 16.04 LTS, 64 bit.
config.vm.box = “ubuntu/xenial64”
# Create a private network, which allows host-only access to the machine
# using a specific IP.
config.vm.network “private_network”, ip: “192.168.33.10”
# Enable provisioning with a shell script. Additional provisioners such as
# Puppet, Chef, Ansible, Salt, and Docker are also available. Please see the
# documentation for more information about their specific syntax and use.
config.vm.provision “shell”, inline: <<-SHELL sudo apt-get update sudo apt-get upgrade –assume-yes sudo apt-get install python-pip –assume-yes pip install -r /vagrant/requirements.txt python /vagrant/hello-world.py &
SHELL
end
The new lines in the file will assign the IP address 192.168.33.10 to your guest from your machine. Start your new guest.
%> vagrant up
This time when the machine comes up you will see it configure itself adding the necessary packages, pip packages and it will start the application.
Now hit the site in your browser here.
It fails! But why? This is actually not a configuraiton or Vagrant problem. Its an application issue. By default the flask app runs only on the local interface of the guest. We will have to change the app. Lets do that on our workstation:
%> vim hello-world.py
Change and save the file:
from flask import Flask
app = Flask(__name__)
@app.route(“/”)
def main():
return “Hello from VictoryCTO!\n\n”
if __name__ == “__main__”:
app.run(debug=True, host=’0.0.0.0′)
Now hit the site in your browser here, and you will see our welcome message as expected.
Finally, lets prove we don’t need to interact with the run time by marking up the welcome message with heading tags.
%> vim hello-world.py
Change and save the file:
from flask import Flask
app = Flask(__name__)
@app.route(“/”)
def main():
return “
Hello from Agile Austin DevOps Sig!
“
if __name__ == “__main__”:
app.run(debug=True, host=’0.0.0.0′)
Hit the site in your browser here one more time and realize you can now develop in a runtime that is described entirely by code.
Conclusion
What we have shown in this article are the following concepts:
- How to set up Vagrant
- How to benefit from workstation directories mounted on the guest.
- The separation of the development environment from the application run time.
- How the developer can make changes to the configuration, dispose of the existing run time and bring up the new run time in minutes (not hours)
If there is a demand, we can go deeper into Vagrant with an Ansible provisioner and a more production-like runtime. Let us know at VictoryCTO.
This article was specifically prepared for the Agile Austin DevOps S.I.G. community. We’d like to thank them for the opportunity to present this topic.